
understanding the process
What To Do Next
There are as many different types of roofs as there are materials to cover them. The important thing is that no matter what type of roof you have, the proper steps and materials are used to build your roofing system. We know most customers don’t care how the roof goes together as long as it doesn’t leak – but remember this one thing, your roof is a system and must be put together properly.
The information contained in this page is specific to “steep-slope” roofing systems (shingled roofs and the like). Other roofing systems may or may not require the same roof construction process. This information is for educational purposes ONLY. At no time does this information replace that of a qualified professional. Tuttle Contracting does NOT recommend working on or replacing your roof yourself.
Definitions:
- Steep Slope Roof: A roof surface of at least 3 units vertical for every 12 units horizontal; a roof pitch of at least 25 degrees.
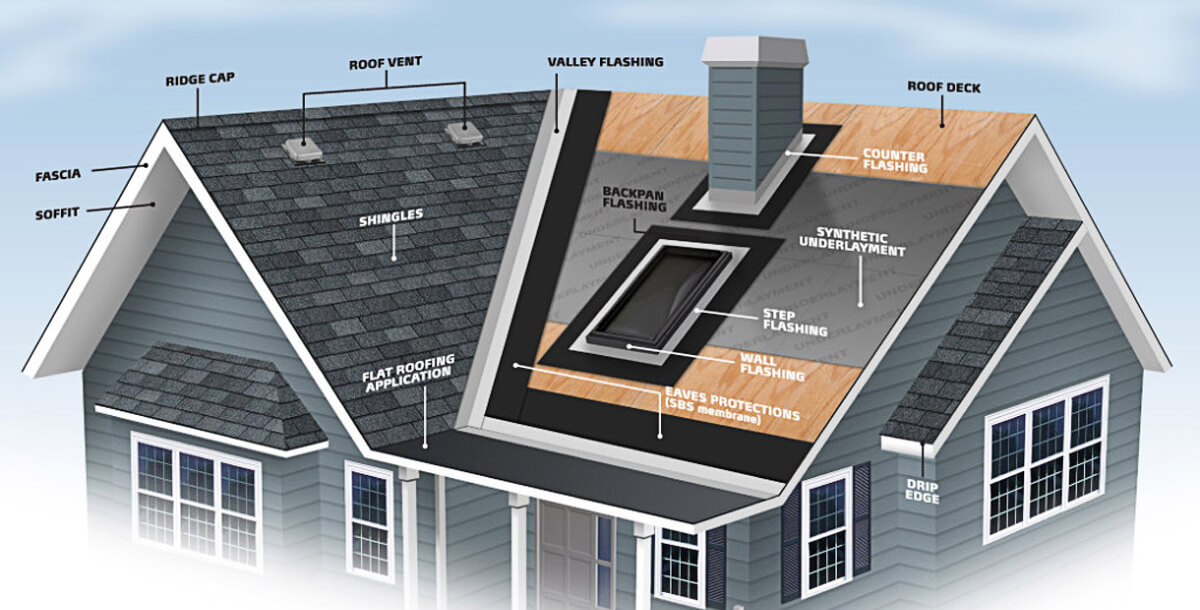
- Roof Covering: The top layer of material used to cover and protect the roof surface. (Shingles, Tile, Slate, Metal, etc.)
- Roof Underlayment: Base layer material installed above the sheathing but under the roof covering.
- Sheathing: Wooden boards or sheets fastened to the roof structure to form the roofing surface.
- Roof Structure: The framework of the roof; rafters or trusses, constructed to support the sheathing.
- Flashing: Metal material installed in a roof system to protect and cover various joints and valleys and prevent water seepage. (Typically used around chimneys, side walls, and valleys)
- Ridge: The external angle formed by two or more sloping roof planes, typically at the top of a roof.
- Valley: The internal angle formed by the intersection of two sloping roof planes.
- Gable or Gable Roof: The vertical triangular portion of the end of a building having a single horizontal ridge and double-sloping roof; a roof that terminates at a gable end.
- Hip or Hip Roof: The inclined external angle (not horizontal) formed by the intersection of two sloping roof planes; a roof with one or more hips.

Selecting a Roof
For most of you this decision has already been made by the engineer when your home was designed and built. Small changes can be made, such as the design of an equal type material, but it is not always possible to change material types. The important factor is that the roof structure must be designed to support the material that will cover and waterproof the roof. For example: asphalt shingles weigh far less than slate or tile.
The majority of homes in the United States have an asphalt composite style shingle. Within this type of shingle there is a variety of designs to choose from. If you have been considering upgrading to a different style shingle, now is a great time because you will only have the cost difference to pay for; the insurance will cover the cost of the original product. See our page on Roofing or Contact a Tuttle Office for more product details.
The Basics of Building a Roof System
A common misunderstanding in roofing is that the shingles (the part you can see) is the most important part; when in reality each part of the system is equally important. Since you cannot see all of the components, this is where many contractors “cut corners” to offer cheap prices. At Tuttle Contracting we not only strive to provide superior service, but also to install a premium roof; never cutting corners, and using premium grade products.
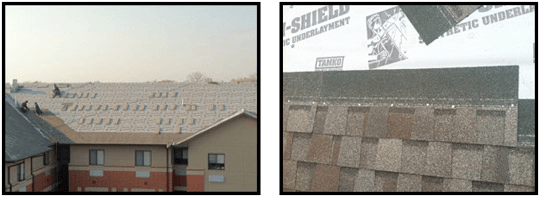
- After the roof is removed, new underlayment must be installed over the sheathing. The underlayment should be attached to the roof using “plastic cap” nails and each course should overlap the next by three to four inches. As with shingles there is a variety of types of underlayment to choose from. For years tar saturated felt-paper, commonly called “felt” or “tar paper” has been the standard in roofing underlayment and is still the most used product today.

- In cold weather climates an ice barrier is needed in addition to the underlayment. An ice barrier does what standard underlayment doesn’t because it has an adhesive backing that adheres to the sheathing and creates a water tight seal. Local code requirements will dictate the necessity of having an ice barrier. But, simply stated it is only needed if snow and ice commonly accumulate on the roof thereby creating the possibility of “ice damming.” Ice damming occurs when ice builds up along the edge of the roof making it possible for water to back-flow under the shingles and into the house.
At Tuttle Contracting, we not only use an ice barrier as needed by code requirements but also around any penetration in the roof (vents, chimneys, etc.) as an additional precautionary measure.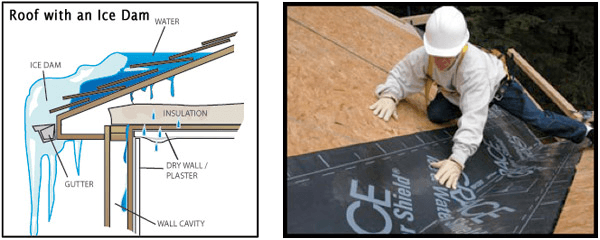
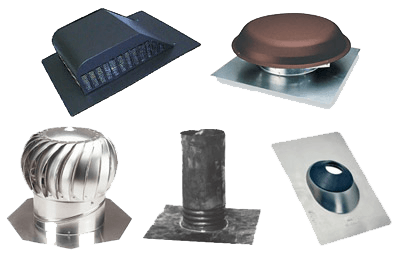
- Once the proper underlayment has been installed, all vents and pipe jacks should be installed (with the exception of ridge vent which is put on after the shingles). While there are a variety of options, all of the vents and pipe jacks are specifically designed to cover and protect penetrations through the roof. But that doesn’t make all vents equal. Depending on the design of your roof, your Tuttle Representative will recommend the most effective options for you and replace all vents and pipe jacks along with rest of the roof. In contrast, this is often where low cost contractors will attempt to “make-up” some cost by NOT telling the customer and NOT replacing these fixtures – they simply reuse the old. This is strongly discouraged as the useful life of these fixtures is limited and it is far more costly to replace them later than it is now along with rest of the roof.
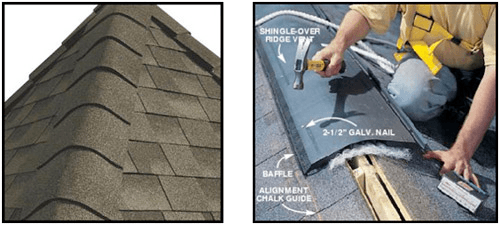
- At this point, you could say the roofing surface has been prepared and you are now ready to begin installing the shingles. The shingles will be installed from the bottom up and will follow a repeating diagonal pattern with a staggered joint pattern. Each shingle must be properly nailed along the designated “nail line” with the nails penetrating at least ¼” through the decking. When done properly with an attention to detail it will result in a waterproof roof that is both functional and cosmetically appealing.
- Once the body of the roof is fully covered with shingles, then the ridge caps must be installed. If the roof design calls for ridge vent, then the ridge vent will also be installed at this time with the ridge shingles being nailed over them. Care should be taken to ensure the ridge lines are straight and that any exposed nail heads are covered with a UV resistant sealant to ensure a water-tight surface.
- At Tuttle Contracting the roof is not considered finished until all of the little details are complete. All fixtures on the roof will be painted to blend and match with the color of the roof you have chosen, the roof will be blown off, your gutters will be cleaned out, and the roof will receive a final inspection by both the Crew Leader and your Tuttle Representative.

- On the ground, everything will be picked up and transported off of your property. Care will be taken to protect and clean around sensitive areas, such as flower beds. Hard surfaces will be swept or blown off, the lawn will be raked to pick-up the little pieces as well as the large ones, and large magnets will be used to ensure nails are not left around your home.


continue reading
Talk To A Pro

Storm damage repair has always attracted a number of “bad elements”, but they seem to be on the rise.
If the thought of filing an insurance claim and replacing your roof seems like it is just too much, you’re not alone.

Even though insurance claim work can seem daunting and complicated, the pricing is actually simplified.